OVERVIEW
Utilising 24V for spotlighting in a retrofit is often the best method over 230V as per is conventional. This is mostly due to the fact that almost all spots/down lights in modern homes are LED. LEDs by their nature don’t work at 230V so there measures put in place to convert it down to a useable voltage. However by dropping down to 24V we avoid any of issues of 230V. One of the main reasons for using 24V is in a retrofit the dimming performance will likely be better.
In addition to this quality of the dimming and the huge reduction in inrush current make 24V lighting our choice when it comes to not just spotlights but also when looking at LED strip lighting.
On this page you’ll find information on what products & configuration are required for LED Spot lights in a retrofit project.
REQUIRED PRODUCTS*
- 24V Warm White Spots or 24V RGBW Spots
- RGBW 24V Dimmer Air
- 24VDC 2.5A in ceiling Power Supply
- Touch Air
- Motion Sensor Air
*In addition to a Miniserver Go
WIRING
When fitting in with the wiring already available in the home the best place to mount the RGBW Air is in the ceiling void. This is mounted in line of the light circuit being controlled. An in ceiling power supply is positioned between the mains supply and the RGBW Dimmer Air and the 24V dimmed supply to the 24V spots that have replaced the 230V spots utilising the existing cable between the dimmer and the spots.
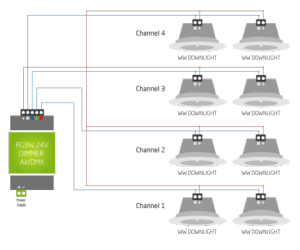
The RGBW 24V Dimmer Air can be used in two forms to allow it to control either single colour Warm White Spotlights, these two modes are referred to as “Individual dimming channels” or “RGBW dimming”. In the diagram below we can see an example of the “Individual dimming channels” with each group of 2 spots being controlled separately to each other group.

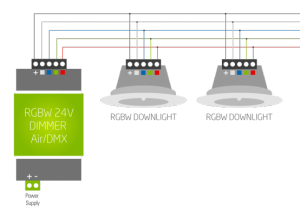
For “RGBW dimming” we need to use all 4 channels in order to have full RGBW (Red, Green, Blue, White) control on each circuit. In the diagram below we can see how each RGBW spot is connected with each channel wired in parallel.

The Touch/Touch Pure Air and Motion Sensor Air require no wiring as they are battery powered and can simply be fitted to the wall/ceiling.
![]() If you have unsure at any point when wiring up any of our devices, please contact a suitably qualified electrician. Alternatively you can contact us for more technical data if required.
If you have unsure at any point when wiring up any of our devices, please contact a suitably qualified electrician. Alternatively you can contact us for more technical data if required.
CONFIGURE AIR DEVICE
![]()
Click here to see documentation on how to learn a Loxone Air Device in to Loxone config.
