The Loxone Air Base Extension is used to extend the Miniserver, and allows the integration of up to 128 devices like sensors, actuator or lighting products that are equipped with the Loxone Air wireless technology.
Loxone Air was developed specifically for building automation, and is able to integrate a large number of compatible devices.
There are battery powered devices available for easy retrofitting as well as devices with fixed power supply.
The communication is encrypted using IPSec, with a different encryption key for each Air Interface / Loxone installation.
Table of Contents
- Commissioning
- Pairing Air Devices
- Pairing Air Devices automatically
- Manually activate pairing mode
- Unpair Air Devices
- Wake up battery powered Air devices
- Update and Status
- Meshing and repeating
- Air Diagnostics
- Air Frequency and Channels
- Concurrency and delays
- Additional information
- Inputs, Outputs, Properties
- Safety Instructions
- Documents
Commissioning↑
The Air Base Extension is installed on a DIN rail in a suitable enclosure.
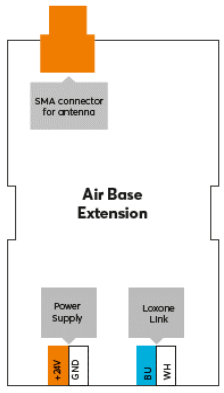
Connect the power supply and Link communication to the Miniserver and install the antenna.

|
To ensure optimal signal quality, use the optionally available rod antenna. If the enclosure is made of metal, install the antenna outside the enclosure using the SMA extension cable that is supplied with the rod antenna. Alternatively, a flat adhesive SMA antenna is available. |
The Extension starts after switching on the power supply, and the status LED will flash orange after a short time when the connection to the Miniserver is established.
Then follow the pairing procedure on the Link Interface.
Pairing Air Devices↑
Pairing Mode
All Air devices have to be paired in Loxone Config via the pairing mode. In delivery state, pairing mode will be active after the power supply has been established.
On most Air devices, the status LED will indicate this by flashing red/green/orange. You can find the exact pairing mode signal in the documentation of the respective Air device.
On most battery powered Air devices the pairing mode is only active for 5 minutes to conserve energy. Briefly remove the battery and then reinsert it to reactivate pairing mode, if necessary.
If an Air device blinks only orange, then it was previously paired, but can no longer establish a connection. In this case, you have to activate the pairing mode manually. On most devices, this is done by pressing the pairing button or power cycling the device.
Searching and pairing
To search for Air devices, first click on an Air Interface in Loxone Config, and then activate Air Device Search
The window that opens will list all Air devices that are in pairing mode. This can take a few minutes:
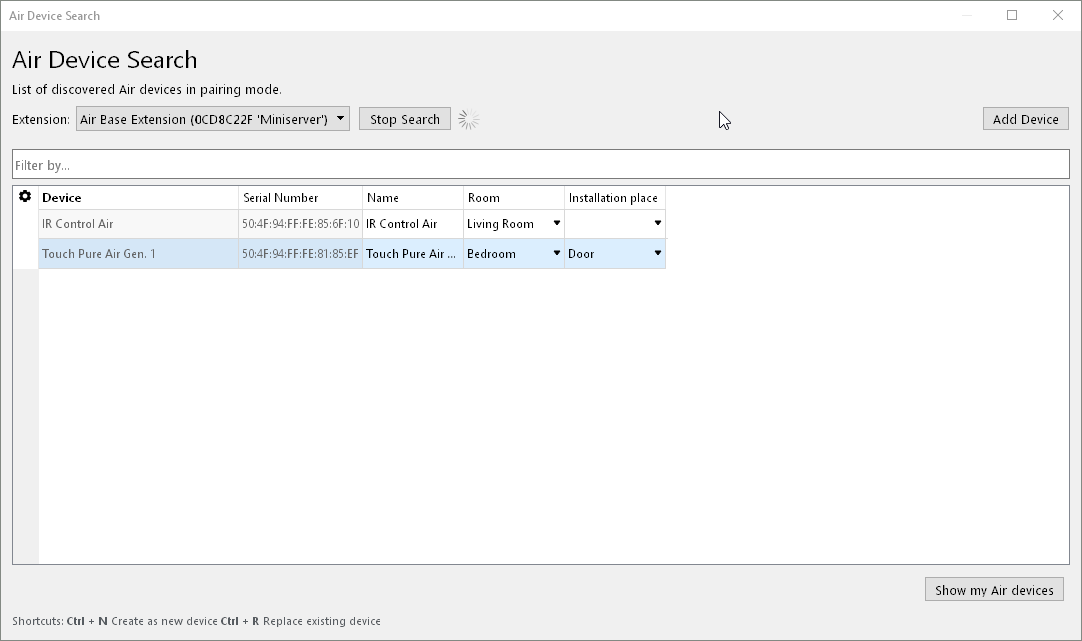
If you select a device here, it will identify itself in different ways. Devices with a status LED will flash it, light fixtures pulse a white light, other devices such as the Loxone Touch emit an audible click. This allows you to assign and name the devices correctly.
Select the desired device, assign a name, room and installation location and add it to the programming using the Pair Device or + button.
The right window lists all the devices that are currently part of the program. You can display them by clicking the button Show my Air devices. You can also replace an existing device with a new device of the same type that was found in the search. This is useful when a device needs to be replaced or devices are added to a pre-configured program. Select the device to be added and the device to be replaced. By clicking on the button with the arrow pointing right, the old device is replaced with the new one in the program.
To apply the changes, save the program in the Miniserver.
Now the added devices are ready for use and the functions are available in the Periphery Tree in Loxone Config.
The Loxone App, under Settings, also supports searching for and pairing Air devices.
Pairing Air Devices automatically↑
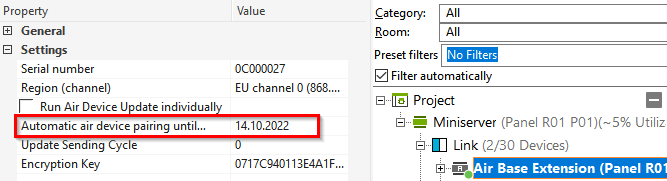
The automatic pairing of Air devices can be activated in the properties of the Air interface for a certain duration:
To pair Air devices automatically via the Air, the Air device must be added in the Config. Therefore click on the Air interface and select the desired device via "Add Air Device".
In the properties window of the respective Air device, the serial number must now be entered:
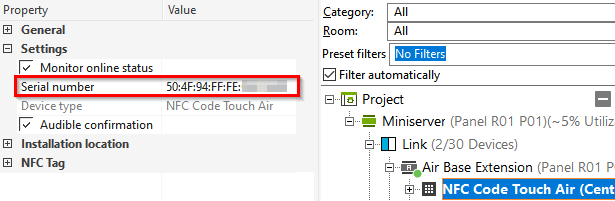
Then save the program to the Miniserver.
Approximately 3 minutes after saving to the Miniserver or restarting the Miniserver, it searches for new Air devices for 4 minutes. Air devices must be in pairing mode in order to be learned in.
The search is repeated every hour if an offline device exists.
Manually activate pairing mode↑
Depending on the device and power supply, there are different methods to manually activate pairing mode:
Battery powered with pairing button
Immediately after inserting the battery, keep the pairing button pressed for at least five seconds until the status LED indicates pairing mode.
e.g. Touch Air, Valve Actuator Air, IR Control Air, etc.
Permanent power supply with pairing button
Keep the pairing button pressed for at least five seconds until the status LED indicates that pairing mode is active.
e.g. Multi Extension, Nano IO, etc
Permanent power supply without pairing button
Switch off the power for 10 seconds, then switch it back on. If no connection to a Miniserver can be established for two minutes, then pairing mode is activated for 30 minutes. During this time the device can be paired.
e.g. RGBW Dimmer Air, Tubular Motor Solidline Air, Shading Actuator Air, etc
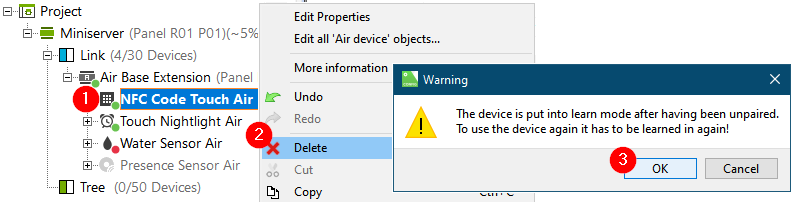
Unpair Air Devices↑
To unpair an Air device and reset it to the delivery state, select the device in the periphery tree and remove it via right click.
Battery powered Air devices must be awake for this.
Wake up battery powered Air devices↑
Battery powered Air devices are typically in a low power state to save energy. They only wake up for a short time, e.g. when a value or button press is transmitted. For this reason, battery powered Air devices cannot be contacted by the Miniserver at all times, and therefore do not identify themselves when they are in low power mode.
To wake up a battery powered Air device, right click on it in Device Status and select Keep device awake:
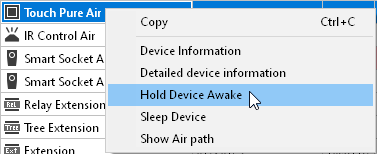
When the device wakes up for the next time, it will stay awake for 5 minutes. To manually wake up a device, press a button or the learn button on the device, or trigger a sensor.
Once the device is awake, additional functions can be executed,
e.g. calibration run and device test, un-pair device, retrieve detailed device information, identify, etc.
By right clicking on the Air Base Extension in Device Status, you can keep all Air devices awake.
Update and Status↑
If an Update is necessary for an Air device, they are highlighted orange in Device Status. This often happens after a recent update of the Miniserver or when adding devices with an older firmware version.
The Miniserver automatically updates Air devices in the background, and it can take up to one hour.
The devices generally remain operational. However, there can be delays in communication. In rare cases, some functions of Air devices may not be available until the update is completed.
Status of Air devices
1. The Status LED of a device allows for quick error checks.
Red/green/orange flashing: Device is in pairing mode.
Orange flashing: No connection to Air Base/Miniserver possible.
Green flashing (continuous or 3 times, then off): Everything okay, Extension is online.
Quick red/green flashing: Device was selected in Loxone Config and is identifying.
Not flashing: Normal operation (the status LED is off or was switched off, depending on the device)
2. In Device Status, Air devices are listed along with details regarding signal strength and battery level.

Meshing and repeating↑
Loxone Air includes a meshing technology to interconnect the Air devices.
In this process, signals from more distant devices are forwarded to the Air Base Extension by Air devices with a fixed power supply, which work as repeaters.
This increases the overall range if a direct radio link from the Air Base Extension to more distant devices is not possible.
The Air Base Extension itself does not operate as a repeater.
Note that communication via repeaters leads to time delays.
If an Air device requires more than two repeaters in succession, we recommend an additional Air Base Extension or Tree to Air Bridge near the low-signal device.
The number of hops (number of repeaters to the Air Base Extension) is limited to a maximum of 5, and can be seen in the Device Status:

Also when starting the Air diagnostics, a graphical overview shows which radio links are established directly, or via other Air devices as repeaters.
Meshing with multiple Air interfaces in the building
Meshing works even across Air devices that are paired at different Air interfaces (Air Base Extensions). However, only if they operate in the same channel.
If the same channel is selected everywhere, meshing results in the greatest spatial coverage.
This is advantageous if (mobile) Air devices are used at different locations in the building.
However, repeater Air devices must also be in operation in the respective areas.
If many Air devices are used, that need to communicate frequently or all at the same time (e.g. Air shading, Air lighting), then the utilization of a channel (temporarily) increases significantly.
In such cases, it is better to select a different channel for each Air interface.
This way, a lower utilization per channel is achieved, but the meshing across devices in different channels is lost.
Since the meshing itself also increases the channel utilization, the repeater functionality can be deactivated for some Air devices in Loxone Config.
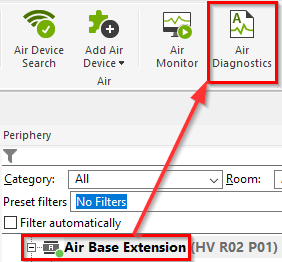
Air Diagnostics↑
Air Diagnostics can be started to draw a graphical representation of all Air devices in the installation:
It shows information about the reception strength, the structure of the radio links and the status of the Air devices. If you point with the mouse on a device, further information is displayed:

Loxone Health Check
The diagnostics of the Miniserver and the Loxone interfaces can be started via the Loxone Health Check:

Air Frequency and Channels↑
All Air devices transmit in one of several channels of the 868/916 MHz frequency band. Depending on the region of the installation, one or more channels are available.
With a high number of transmitted data packets within a channel, this channel can be occupied to such an extent that delays or communication errors occur. This can be caused by third party devices, but also by a very high number of active Air devices in the same channel.
For this reason, the channels can be checked and changed for each Air interface and its paired devices, if necessary.
Channel-Check
To check the occupation of the channel, right-click on a Air Interface in the device status, and select “Detailed Device Information”:

After a short period of time, an editor window is opened with the report. Search for the Channel-Check informations in the report.
In the following example, the current Channel 0 is occupied by 12%. Channel 100 on the other hand is occupied by only 1 %. So a change to Channel 100 would improve the situation.

Keep in mind that the Channel-Check only reflects the situation at the time it was started. The numbers 1-6 just show the distribution of the evaluation in school grades.
Change Frequency or Channel
The channel can be changed in the properties of an Air interface. Only a channel suitable for the region of the installation may be selected:

Then a window opens with the Air devices, and their status.
Follow the instructions, and then click on Change frequency:

Devices that are already online will then start applying the change.
Finally, click Save in Miniserver to apply the changed channel to the program:

All other (battery-powered) devices apply the change the next time they wake up. To speed up this process, wake them up by pressing a button, for example.
When changing to a frequency band of another region, the process is slightly different. In this case all devices have to be woken up and online before changing the frequency.
Concurrency and delays↑
In contrast to Loxone Tree, Loxone Air does not support broadcasts.
This means that Air devices are not controlled simultaneously, but in short intervals one after the other. The resulting delay is in the range of milliseconds, and is usually not noticeable.
In case of low reception strength, a busy radio channel, or if devices communicate via repeaters, these delays become larger, and are then noticeable in certain applications.
This may be seen in delayed switching of individual Air devices when several are switched at the same time.
Additional information↑
Online/Offline Handling of Air Devices
Diagnostic Inputs↑
| Summary | Description | Unit | Value Range |
|---|---|---|---|
| Online Status Air Base Extension | Indicates whether the device can be reached by the Miniserver. Diagnostics for Air devices Diagnostics for Tree devices Diagnostics for Extensions |
Digital | 0/1 |
| Channel Free Air Base Extension | Indicates whether the device can be reached by the Miniserver. Diagnostics for Air devices Diagnostics for Tree devices Diagnostics for Extensions |
Digital | 0/1 |
Properties↑
| Summary | Description | Default Value |
|---|---|---|
| Serial Number | Specifies the serial number of the device. For Extensions: Enter 'Auto' to automatically pair an extension with unknown serial number. This can only be used if there is only one Extension of the same type. Save into the Miniserver, in order to pair the Extension. Afterwards the program must be loaded from the Miniserver to transfer the actual serial number of the Extension into the program. |
- |
| Region (channel) | The selected region affects the operation frequency Please be aware of local government regulations! |
- |
| Update Air Devices Individually | Only one Air Device is updated at a time. This reduces the utilisation of the radio channel. | - |
| Automatic air device pairing until… | Until that date, Air devices added manually with serial number will be paired automatically as soon as they are found. | - |
| Encryption Key | Key for the 128bit AES encryption of Air communication. Hexadecimal, 32 byte length. | - |
| Recreate Encryption Key | Create a new encryption key. Already learned devices need to be relearned! | - |
| Monitor Online Status | When selected, you will be notified via System Status or the Mailer if the device is no longer available or goes offline. | - |
Safety Instructions↑
Installation must be carried out by a qualified electrician in accordance with the applicable regulations.
This device must be mounted on a DIN rail in an electrical distribution enclosure to ensure protection against contact, water and dust.