INTRODUCTION
In this guide you can find all the information for setting up your Loxone Music Server and how to set it up with Loxone Config so you can use the apps to control the music!
GENERAL INFORMATION
If you log on to the actual Loxone Music Server using a screen and keyboard the username is “Loxone” (no password) and the computer name is “MusicServer”. We recommend that these are not changed, as home networks are usually protected by the router and the Music Server is not a big security risk. Nevertheless, should a new username be used the following points should be noted:
- If you change the username or password the computer may reboot specifying the new login information is required.
- If the user name for logging on to the server is changed, this must be taken into account in the path statement. For example, the user name of “userold” changed to “usernew”, so the directory C:\Users\userold\Music\CasaTunes must be changed to C:\Users\usernew\Music\CasaTunes.
WIRING
Cable cross-section between a speaker and the music server: up to 20m should be 1.5 mm², from 20 to 50m should be 2.5mm². If the cable length is more than 50m, the cross-section rule must be adapted accordingly. You can use any standard speaker wire.
Speaker installation boxes for cast concrete ceilings should have a volume of 7-10l as well as suitable options for mounting the speaker. We are looking to provide installation boxes that suit our speakers via our webshop soon.
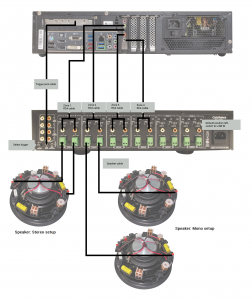
Below is a diagram of how speakers would be connected either in mono or stereo setup. You also need to run a CAT cable from the Music Server to your router.
CONNECT TO SETUP
You can remotely run CasaSetup on any computer that is connected to the LAN. For Windows the addresses to enter into your browser are:
http://<serverIP>/CasaSetup
For a Mac the addresses are:
http://<serverIP>.local/CasaSetup
To directly connect to CasaSetup from the Music System itself the address is:
http://localhost/CasaSetup
To find the IP of the Music Server look at the connected devices in your router by going to your router setup on your browser (usually the IP address 192.168.1.1 or 192.168.0.1 you can find this in the information that comes with your router).
Click on the below menu options to see how to configure each part of CasaSetup for your Music Server.
LANGUAGE
Once you are connected to CasaSetup you will be greeted with the screen below. You can change the language with the drop down list in the top right hand corner.

SELECT CONTROLLER
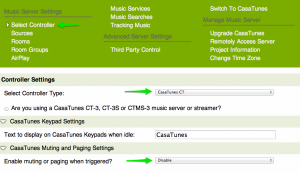
You will be on the Select Controller page of the menu and here the controller type should be CasaTunes CT.
For the option ‘Enable muting or paging when triggered?’ you can set this to Disable. This option allows you to use the trigger inputs to play a doorbell sound or mute pages. The trigger inputs require a voltage to trigger them.
THIRD PARTY CONTROL
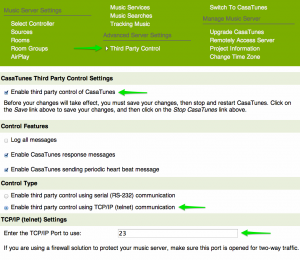
Once in CasaSetup you need to change the Third party Control settings to allow the Miniserver to control the Music Server.
Tick the box next to ‘Enable third party control of CasaTunes’ under the Settings. Then in Control Type select ‘Enable third party control using TCP/IP (telnet) communication’.
The TCP/IP port should remain as 23.
SOURCES
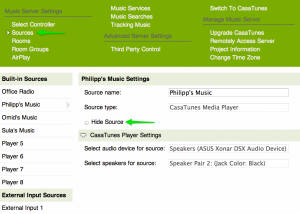
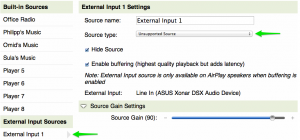
Next up is the Sources, in this menu you can give the sources names. There will be 8 or 12 inbuilt sources depending on which Music Server you have bought. These sources allow you to setup different music on them and then you choose which source to play in which room. For example one could be Jazz Playlist, and another could be Dad’s Favourites.
If you don’t want to show all the sources you can hide them by ticking the ‘Hide Source’ box.
There are also 1-2 external sources on the Music Server which can have CD players or AM/FM tuners connected to. They are the 3.5mm jack inputs on the back of the Music Server:

Now you can edit the external source in CasaSetup as well. You can choose the type of source that is connected if available and you can also edit the gain.
ROOMS
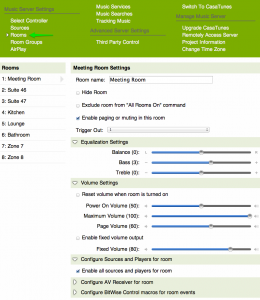
Similar to the Sources menu you can also edit the rooms. There will either be 8 or 12 rooms depending on the Music Server you have bought (8 or 12 zone). You can choose to hide the room if necessary and you can choose all the volume settings for each room. You can either enable all sources for a room or choose a particular source.
ROOM GROUPS
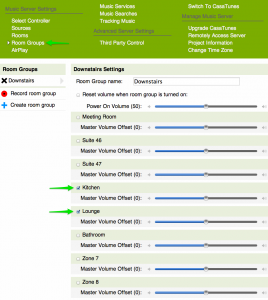
You can also create combinations of rooms called Room Groups. This then allows you to play a particular source to a room group, for example ‘Downstairs’ play the party source!
AIRPLAY
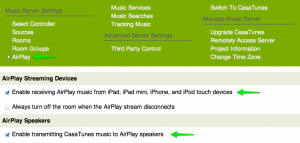
The Loxone Music Server also supports Airplay. Make sure you have ticked the box in the Airplay menu that allows you to use iOS devices with the server. Then you can Airplay music from your phone to the server.
If you have also ticked the box “Enable transmitting CasaTunes music to AirPlay speakers” you can play music from the server through the speakers of an Airplay device.
MUSIC SERVICES
Loxone Music Servers can store music locally or play from Internet music services which you can setup in CasaSetup by entering your login details for the different services such as Spotify and Grooveshark. Adding music locally can be done by manually adding music to the Music folder on the music server.
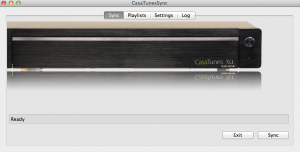
Or you can use CasaTunesSync to put music from your iTunes library on to the Music Server. It allows you to either sync the whole library or certain playlists. When CasaTunes Sync asks for details enter the IP of the server.
Username: casauser
Password: Leave blank
If you see a song or album showing up without any information it is important to check that the album name or artist name are correctly assigned in iTunes and are present in the meta data of the song. If this is not the case make sure to enter the artist name or album name into the corresponding field in iTunes for that song.
If incorrect album art is displayed this can be caused by a problem with the folder structure of iTunes. To fix this in the Settings menu in the Advanced tab in iTunes tick the option ‘Keep iTunes Media folder organized’. Then select File – Library – Organize Library, and tick the option ‘Consolidate files’.
SETUP IN LOXONE CONFIG
In order to control the Music Server from our Loxone App you need to first configure a few things in Loxone Config. It is very straightforward! You can of course also still use the CasaTunes webinterface to control the music.
Click on the headings to find out more about setting up your Music Server in Loxone Config.
FIRST ADD THE MUSIC SERVER
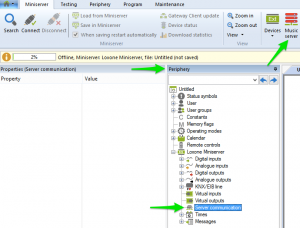
First of all click in the Periphery tree on Server communication. Then in the blue ribbon click on the Music server button to add the Music Server in. Now click on the Music Server under Server communication in the Periphery tree to see the properties of the Music Server.
Give the server a name for example ‘My House Music Server’ and then enter the IP address of the server in the box ‘Address’. The IP address must be in the format: http://<IPaddress>:8731.
So for example put in the box Address: http://192.168.1.90:8731. The port must be entered!
THEN MUSIC SERVER ZONE BLOCKS
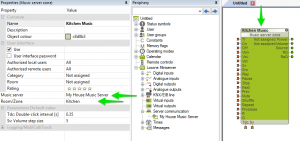
Now you need to add in a Music server zone block for each room you have audio in. In the properties of the block it is very important to enter the room name and this must match the name of the room from CasaSetup (CAPS and spacing important!).
You can see the Music Server has already been assigned to the block. If you had 2 Music Servers you can choose which server this block controls a room of.
Finally give the block a name such as ‘Kitchen Music’ as this shows on the user interface.
LEGACY
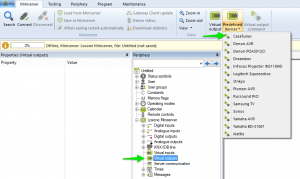
With older versions of Loxone Config prior to 5.0 controlling CasaTunes servers was done using a predefined template for virtual outputs. You can still use the commands from this template to control your Loxone Music server and it is how you can add commands to play a particular playlist or radio station.
To do this first save the playlist using the CasaTunes webinterface, this can be accessed by the same links as for CasaSetup but replacing with CasaTunes in the link instead, for example http://<serverIP>/CasaTunes.
Then add additional commands to the CasaTunes virtual output.
!PLAYMUSIC,ZON1,NAM”Playlist1″\r\x04 will play the playlist Playlist1 immediately in Zone 1
!PLAYMUSIC,ZON1,NAM”Playlist1″,ADD\r\x04 will add the playlist Playlist1 to the queue of Zone 1
Adjust the command depending on which zone of your multi room music system you want the playlist to be played in. For example, to play the playlist Jazz in Zone 4 the command would be:
!PLAYMUSIC,ZON4,NAM”Jazz”\r\x04
You can play radio stations in the same way by saving the radio station as a playlist first in the CasaTunes webinterface.
WEB COMMANDS
The following web commands can be used on a browser to control the Music Server, they are similar to the commands on any computer:
| Description | Command |
| Shutdown the Music Server | http://<IPaddress>:8735/api/v1/system/power/shutdown |
| Start the Music Server | http://<IPaddress>:8735/api/v1/system/power/restart |
| Put the Music Server in energy saving mode | http://<IPaddress>:8735/api/v1/system/power/sleep |
| Put the Music Server into hibernation mode | http://<IPaddress>:8735/api/v1/system/power/hibernate |
TROUBLESHOOTING
If you experience a problem with your Music Server this can usually be resolved by restarting the CasaTunes service. To do this go to CasaSetup web interface. Then you can click on the button that stops the CasaTunes service.

This may take a minute and then once you see the button to restart the service click on this. The Music Server will then restart.

Finally if needed you can reset the Music Server to factory defaults. To do this you need to connect a screen and mouse or keyboard to the Music Server (it runs Windows). Navigate to C: \ ProgramData \ CasaTools \ CasaTunes \ 2.0.0.0 \ Factory and then double click on the FactoryReset.cmd file and follow the instructions. Then do a restart of the Music Server.