This active loudspeaker features a woofer with a coaxially integrated tweeter.
It is powered by 24V and connected to an Audioserver or Miniserver Compact via Tree Turbo. Through the Master Client Interface (MCI), it can transmit the audio signal to up to 20 additional Client Speakers. It also supports wireless music streaming via Bluetooth.
For optimal sound, the speaker must be installed in a suitable enclosure or a closed ceiling or wall.
Datasheet Install Speaker 7 Master
Table of Contents
- Mounting
- Commissioning
- SD Card
- Speaker Installation Planning
- Programming examples
- Bluetooth Functionality
- LED Status
- Inputs, Outputs, Properties
- Safety Instructions
- Documents
Mounting↑
Connect the 24V DC power supply and the Tree Turbo data lines to the speaker as follows:

To a Master Speaker, up to 20 Client Speakers can be connected in a line via the Master-Client Interface (MCI):


|
The audio signal is transmitted digitally from speaker to speaker. The system compensates for differences in signal transit time and therefore only works with the wiring shown in a linear configuration. On the MCI data lines, there must be no branching or parallel connection to additional speakers! |
|
|
When only a few speakers are used, the power lines can also be run in a linear fashion. When using many speakers in a line, voltage drop becomes the limiting factor. This can be addressed by using wires with a larger cross-section, shorter cables, or additional 24V power lines. It is essential to always connect the grounds of different power lines. |
The connection cable must be secured to the metal bridge of the speaker basket with the cable tie for strain relief:

Mounting the Speaker:
Ensure that there are no loose foreign objects in the mounting opening to prevent any background noise.
Insert the speaker into the opening and screw it in place at the front.
The retaining clips will fold out inside and secure the speaker tightly.
Make sure that the speaker fits snugly all around.
Attach the front grille, which is held magnetically.
Commissioning↑
After connecting and switching on the power supply, the speaker boots up for about 30 seconds and is then ready for pairing via Tree Turbo.
The Master Speaker will go into pairing mode after 5 minutes if it cannot connect to the Audioserver or Miniserver Compact that it was paired with.
SD Card↑
The Micro SD card, located at the back side of the speaker on PCB, contains the operating system and settings. Please disconnect power connection from the device while handling the SD Card.
The SD card can be removed as follows:
-
Slide the hinge type slot towards the center of PCB with your finger.
-
Open the hinge and remove the SD card.
Speaker Installation Planning↑
Loxone Install Speakers require installation in a closed enclosure or a cavity, such as in ceilings or walls, to fully develop their sound volume.
Suitable mounting enclosures for drywall or concrete installation are available in the Loxone Shop.
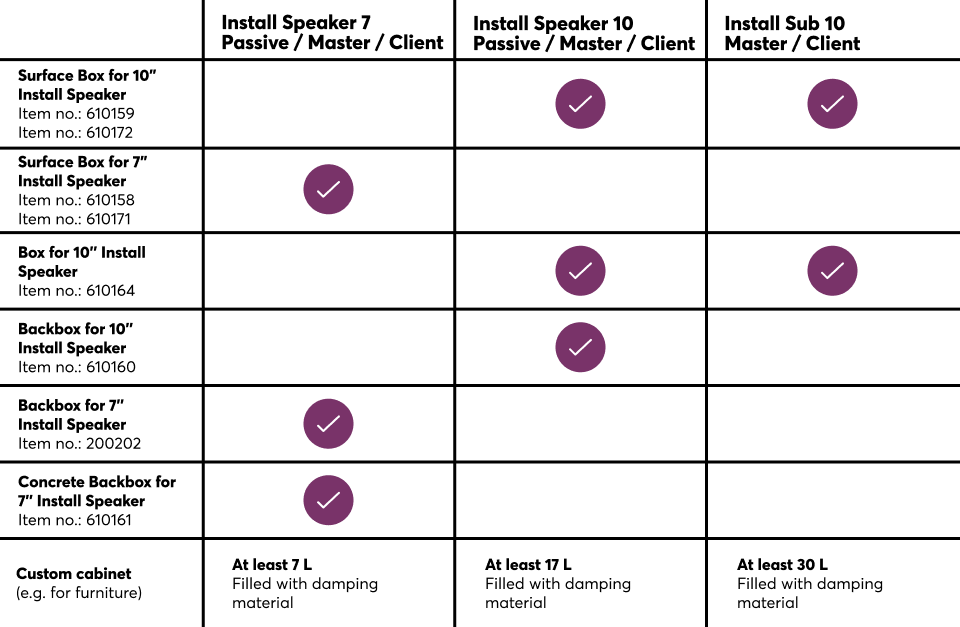
While a mounting enclosure is not necessarily required for completely enclosed surfaces, speakers must be mounted in a rear mounting enclosure for open surface structures, like acoustic ceilings.
The acoustically necessary volume for installation depends on the speaker size and type:
| Speaker Type | Minimal volume | Recommended volume |
|---|---|---|
| Install Speaker 7 | 7.2l | 9l or more |
| Install Speaker 10 | 14.5l | 18l or more |
| Install Sub 10 | 18l | 30l |
Larger enclosures or cavities may also be used, provided they are closed.
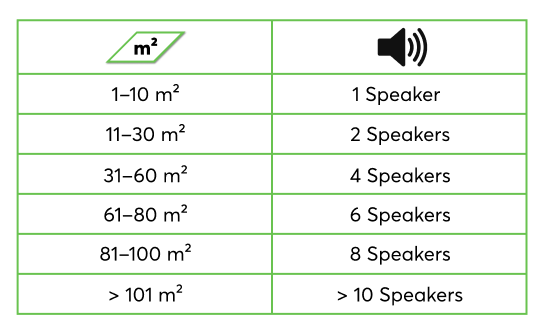
Speaker Quantity
In main living areas, at least two speakers should be used to achieve good sound quality. For small rooms or ancillary spaces, a single speaker is usually sufficient.
Depending on the room size, we recommend planning the following number of speakers per room:
Ceiling installation
Plan the speaker installation positions to be evenly distributed throughout the room. A minimum distance of 50cm/20″ from walls should be maintained to avoid sound reflections.
In ceiling installations, the stereo effect is barely noticeable and can often be neglected. Therefore, a full stereo signal is later assigned to each individual speaker via the connection to the Audio Player block (Downmix).
Wall installation
At the most frequently used listening position, at least two speakers should be arranged to achieve a good stereo effect.
The left-right assignment of the speakers is made later through the connection to the Audio Player block.
Programming examples↑
Example 1:
A Master and Client Speaker line on the same Audio Player function block
Environment:
A room with limited space
Installation:
3 Client Speakers are connected and paired with one Master Speaker
Programming:
1 Audio Player function block:
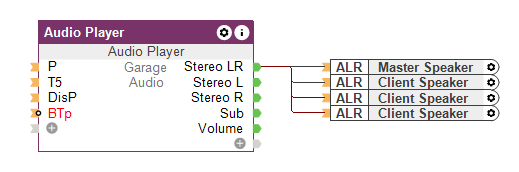
Result:
The speakers always behave identically in terms of selected source and volume.
Example 2:
A Master and Client Speaker line on different Audio Player function blocks
Environment:
Small restaurant with a bar, the two areas are acoustically adjacent
Installation:
5 Client Speakers are connected and paired with one Master Speaker
Programming:
2 Audio Player function blocks, 1x for restaurant, 1x for bar, both combined in a fixed group:

Result:
Both areas can sensibly only play the same audio source. However, the volume at the bar can be changed or muted independently of the restaurant.
If different audio sources are to be played simultaneously in two or more rooms, an additional Master Speaker must be used per room.
Example 3:
2 lines consisting of 1 Master and 1 Client Speaker each
Environment:
Two separate living spaces
Installation:
One Client Speaker is connected to each respective Master Speaker per room and paired
Programming:
1 Audio Player function block per room:

Result:
Both rooms can be operated completely independently in terms of source and volume.
Bluetooth Functionality↑
Activating Bluetooth
To enable Bluetooth functionality:
In the user interface: Navigate to the Audio Player settings and activate Bluetooth in the Bluetooth menu.
In Config: Set the BTp parameter on the Audio Player.
In Config (Fixed Group): Set the BTp parameter on the Audio Player within the Fixed Group.
Visible Bluetooth Name
The displayed Bluetooth name is determined as follows:
Single Master Speaker on the Audio Player: Displays the name of the room assigned to the Audio Player.
Two or More Master Speakers on the Audio Player: Displays the names of the outputs connected to the Audio Player.
Single Master Speaker in a Fixed Group: Displays the name of the Fixed Group.
Two or more Master Speakers in a Fixed Group (with only one Master Speaker per Audio Player): Displays the names of the rooms assigned to the Audio Players.
Bluetooth Reset
Performing a Bluetooth reset will remove all previously paired devices:
In the user interface: Use the Bluetooth menu in the Audio Player settings to reset.
In Config: Trigger the reset using the Rtd (Reset to Default) input on the Audio Player.
Streaming Bluetooth Signal to Other Zones
The Bluetooth signal can be streamed to additional zones via Dynamic Grouping in the user interface.
LED Status↑
| Status LED | Description |
|---|---|
|
|
Device was selected in Loxone Config and is identifying. |
|
|
Connection to Audioserver or Miniserver Compact is okay, but the device has not yet been paired or is offline. |
|
|
Device operational, paired and online. |
|
|
Device cannot connect to the Audioserver or Miniserver Compact via Tree Turbo. |
|
|
SD card cannot be read. Check SD card. |


Diagnostic Inputs↑
| Summary | Description | Unit | Value Range |
|---|---|---|---|
| Amplifier limit | If the temperature of the amplifier reaches a critical point, the volume of the zone is reduced. This may be due to overloading or excessively high ambient temperature. | - | 0/1 |
| Online Status Install Speaker 7 Master 1 | Indicates whether the device can be reached by the Miniserver. Diagnostics for Air devices Diagnostics for Tree devices Diagnostics for Extensions |
Digital | 0/1 |
| Temperature Shutdown | Input is active, when the outputs of the device have been switched off due to high device temperature. Possible reasons: Ambient temperature too high, outputs overloaded. | Digital | 0/1 |
Properties↑
| Summary | Description | Value Range | Default Value |
|---|---|---|---|
| Serial Number | Specifies the serial number of the device. | - | - |
| Monitor Online Status | If checked, you will be notified via System Status or the Mailer if the device is no longer available or goes offline. | - | - |
| Maximum Volume | Determines the maximum (physical) output power of the amplifier in percent, thus limiting the maximum possible volume for this output. The volume values from 0-100% of the Audio Player or App are scaled accordingly. | 0...100 | 100 |
| Gain | Increases or decreases the volume of this output in percent. Adjusts the volume of outputs used with different speakers or in different environments, making it possible to achieve equal volume levels. Is scaled and limited with the specified maximum volume. | -20...20 | 0 |
Safety Instructions↑
Installation must be carried out by a qualified electrician in accordance with the applicable regulations.
Install the speaker in a way that the electronics on the back are protected from contact, damage, dirt and moisture.
Documents↑
Datasheet Install Speaker 7 Master