The Lighting Controller function block enables the control and operation of lighting in a room or an area.
It supports switched and dimmed lighting as well as coloured light and luminaires with different interfaces.
The individual lights can be adjusted as desired and any combination can be saved as a lighting mood.
In combination with presence or motion detectors and brightness sensors, the block provides automatic lighting control.
Apart from the Loxone App, it is operated by the centre button of a Loxone Touch according to the switch standard, or by conventional buttons.
You can find inspiration and use cases regarding the numerous possibilities with lighting control on our website.
Table of Contents
- Inputs
- Outputs
- Parameters
- Properties
- Programming example
- Light Circuits
- Moods
- Automatic on Presence/Motion
- Presence inputs
- Daylight Control
- Presence Simulation
- History
Inputs↑
| Abbreviation | Summary | Description | Unit | Value Range |
|---|---|---|---|---|
| Lc1-4 | Light circuit 1-4 | Activates output (Lc1-4). Long-click for dimming. |
- | 0/1 |
| M+ | Next mood | Pulse: Selects next mood. Double-click: Turns off lights and sends pulse to output (2C). Triple-click: Turns off lights and sends pulse to outputs (3C) and (2C). |
- | 0/1 |
| M- | Previous mood | Pulse: Selects previous mood. Double-click: Turns off lights and sends pulse to output (2C). Triple-click: Turns off lights and sends pulse to outputs (3C) and (2C). |
- | 0/1 |
| Mood | Select mood by ID | - | 0...99 | |
| Off | Off | Pulse: Outputs are reset / switched off. On: Block is locked. Dominating input. An alarm can still be triggered via the input (Alarm). The name of the connected sensor is used in the user interface. |
- | 0/1 |
| T5/1-8 | T5 control | Pulse: First pulse selects the assigned mood, every subsequent pulse switches to the next mood. If there is no additional pulse for 30 seconds, a pulse selects the assigned mood again. Long-click: Either mixes in the mood (Mmd) or switches to the next mood. Double-click: Turns off lights and sends pulse to output (2C). Triple-click: Turns off lights and sends pulse to outputs (3C) and (2C). |
- | ∞ |
| DisP | Disable presence / motion | Disables inputs (P) and (Mo) when 1. Lights activated by presence (P) are switched off immediately. If lights were activated by motion (Mo), (Moet) timer is started on rising edge at (DisP) and lights are switched off after expiration. If the extend time of (Met) is shorter than (Moet), (Met) is used instead. |
- | 0/1 |
| Mo | Motion | Activates the lighting mood configured for motion / presence when 1. By falling edge, the lighting is switched off after expiration of parameter (Moet). If the lighting is operated manually, the lighting is only switched off after parameter (Met) has expired. |
- | 0/1 |
| On | All on | Activates mood with ID 99. If no mood with ID 99 is configured, all used outputs (Lc1-18) will be activated with brightness set in parameter (MaxAbr). |
- | 0/1 |
| Alarm | Alarm | All used outputs (Lc1-18) start flashing when 1. Parameter (MaxAbr) defines the brightness, parameter (Afi) defines the flashing interval. ID 99 is displayed at the output (M). If the input (Off) is 1, an alarm can still be triggered. |
- | 0/1 |
| Buzzer | Buzzer | Activates alarm clock mood (ID 98) when 1. Parameter (Fbu) defines the fading time. Fading is only supported by Smart actuators. If no alarm clock mood is configured, the mood with ID 99 is used instead. Lighting is switched off after the time set in parameter (Met) has expired. |
- | 0/1 |
| Br | Current brightness | If the current brightness exceeds the threshold (Brt), presence / motion is ignored. | lux | 0...∞ |
| DisPc | Disable periphery control | Disables inputs (Lc1-4, M+, M-, Mood, Off, T5/1-8, On, Buzzer, MBr) when On. (e.g Child lock, cleaning) Control via user interface is still possible. |
- | 0/1 |
| P | Presence | Activates the lighting mood configured for motion / presence when 1. If the lighting is operated manually, lighting is switched off only after the time set in parameter (Met) has expired. |
- | 0/1 |
| Rtd | Reset to default | Resets parameters and settings of the block to the default values as specified in the block preset. | - | 0/1 |
| MBr | Master Brightness | Sets the brightness of outputs (Lc1-18) to a value relative to the input (MBr). E.g. Input (MBr) = 20%, output (Lc1) = 40% : The brightness of output (Lc1) is always twice the master brightness (MBr). |
- | ∞ |
Outputs↑
| Abbreviation | Summary | Description | Value Range |
|---|---|---|---|
| Lc1-18 | Light circuit 1-18 | Output for light circuit 1-18 Usage based on actuator type. |
0...100 |
| M | Current mood | Predefined mood IDs: 0: Off 98: Buzzer (Alarm clock) 99: All on -1: User defined mood -3: Multiple moods mixed |
-3...99 |
| 2C | Pulse on double-click | Pulse on a double- or triple-click or pulse on input (Off). | 0/1 |
| 3C | Pulse on triple-click | Pulse on a triple-click. | 0/1 |
| AC | API Connector | Intelligent API based connector. API Commands |
- |
Parameters↑
| Abbreviation | Summary | Description | Unit | Value Range | Default Value |
|---|---|---|---|---|---|
| Rem | Remanence input | Remanence input: If active, the function block retains its previous state after a Miniserver reboot. The state of the function block is saved: – When saving to the Miniserver – At a planned reboot – Before a backup – Once per hour The data is saved on the SD card. |
- | 0/1 | 0 |
| Tdc | Time double-click | s | 0...∞ | 0,35 | |
| Sts | Step size brightness | % | 0...100 | 2 | |
| Str | Step rate brightness | Brightness is in-/decreased by (Sts) every (Str) seconds on long-click. | s | 0...∞ | 0,2 |
| MinBr | Minimum brightness (0 to 50%) | Minimum Brightness when Lc outputs are dimmed directly with Lc Inputs. | % | 0...50 | 0 |
| MaxBr | Maximum brightness (50 to 100%) | Maximum Brightness when Lc outputs are dimmed directly with Lc Inputs. | % | 50...100 | 100 |
| Dm | Dim mode | 1 = Dim between parameters (MinBr) and (MaxBr) on long-click. 0 = Stop dimming when reaching parameter (MinBr) or parameter (MaxBr) on long-click. |
- | 0/1 | 0 |
| Lv | Last value output Lc1-4 | 1 = Set brightness to (MaxBr) when switching on ouput (Lc1-4) through input (Lc1-4). 0 = Set last brightness value when when switching on ouput (Lc1-4) through input (Lc1-4). |
- | 0/1 | 0 |
| Moet | Motion extend time | Starts with the falling edge of (Mo) and extends presence by set time. If the extend time of (Met) is shorter than (Moet), (Met) will be used instead. 0 = Deactivates automatic switch-off. Paramenter does not apply to presence input (P)! |
s | 0...∞ | 900 |
| Pto | Presence automatic timeout | Disables the presence / motion automatic after manually switching off lights. Input (Mo): Pulse on input (Mo) restarts the timeout. Re-enables presence / motion automatic when there was no motion for set time. 0 = Deactivates this function. Input (P): Parameter value automatically set to 0.01 when input (P) is used. Re-enables presence / motion automatic immediately after presence has ended. |
s | 0...∞ | 300 |
| Pm | Presence mood | >0 = Sets a specified mood (ID) which will be started with input (P) or (Mo). 0 = Mood set in the motion / presence automatic will apply. If the specified mood (ID) does not exist, the mood set in the presence / motion automatic will apply! |
- | ∞ | 0 |
| Met | Manual operation extend time | Lights will automatically switch off after this time, even if manually operated. Input DisP does not prevent switching lights off. Timer starts after the end of motion / presence or with a falling edge at the input (Buzzer). 0 = Deactivates automatic switch-off. |
s | 0...∞ | 3600 |
| Ao | Alternative operation Lc1-4 | When 1, a pulse will cycle through the primary colors of the RGB output. Long-click for dimming. |
- | 0/1 | 0 |
| Afi | Alarm flashing interval | Defines the flashing interval of the lights during alarm. E.g. 2s = 1s On, 1s Off |
s | 0.1...∞ | 4 |
| Fbu | Fading time buzzer | Fading time of the alarm clock mood, when input (Buzzer) is triggered. Only applies to supported Smart Actuator devices. |
min | 0...60 | 3 |
| Brt | Brightness threshold | If the input (Br) exceeds the threshold of parameter (Brt), inputs (Mo), (P), (P/1-8) are disabled. | lux | 0...∞ | 30 |
| Mmd | Mixing moods duration | Long click duration required to mix in an additional mood via the inputs (T5/1-8). 0 = No mixing of assigned mood. |
s | 0...∞ | 1 |
| Ft | Fading time | Fading time when changing moods. Only applies to supported Smart Actuator devices. | s | 0...1800 | 1 |
| MaxAbr | Maximum alarm brightness | When input (Alarm) is 1, used outputs (Lc1-18) start flashing between value 0 and parameter (MaxAbr). When input (On) is 1, used outputs are set to parameter (MaxAbr) if no mood with ID 99 is configured. |
% | 10...100 | 50 |
| MinCt | Minimum color temperature | Minimum color temperature (warm) for daylight control. | K | 2000...4000 | 2700 |
| MaxCt | Maximum color temperature | Maximum color temperature (cool) for daylight control. | K | 4000...12000 | 6500 |
Properties↑
| Summary | Description | Value Range | Default Value |
|---|---|---|---|
| History Entries | Number of entries in the control history. 0: History is disabled Control history tracks relevant changes since program start. |
0...100 | 20 |
| Moods | Manage Moods and Operating Modes | - | - |
Programming example↑
The following example shows the basic programming of the block:

A Loxone Touch is connected to the block's input (T5/1) for operation. A Presence Sensor is connected to input (P). In addition, the block is provided with the brightness value from the Presence Sensor at (Br).
The different actuators or lighting circuits can be connected to the outputs of the block. The above example shows some possibilities:
(Q1) is used to switch a conventional light via a relay output.
(AQ1) is used to control a dimmable light.
The SMA actuator controls an LED strip via an RGBW Dimmer and allows the control of colored lighting.
The LG actuator combines multiple lights into a lighting group, and controls them together.
The Presence block is used to combine multiple Presence or Motion Sensors and other devices and use them together to detect presence.
The Presence block is then connected to the (P) input of the Lighting Controller:

Light Circuits↑
Double-click on the block to access the settings for the light circuits.
Here you can define the names for the individual lights, which are used in the user interface.
The actuator type is automatically selected to match the connected actuator.
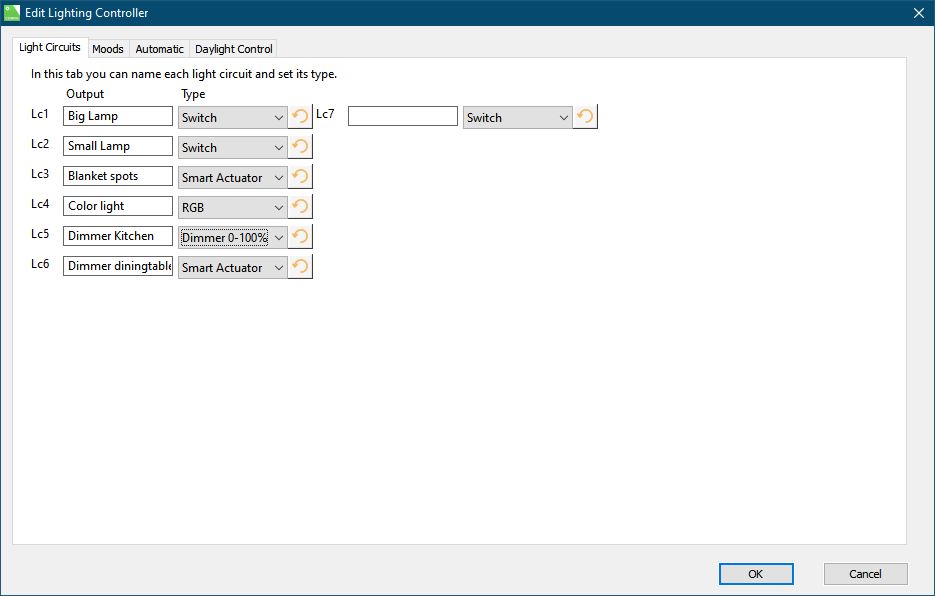
Settings of the actuator type:
Switch
Dimmer 0-100%
Dimmer 0-10V
Dimmer 1-10V
RGB
Lumitech
Moods↑
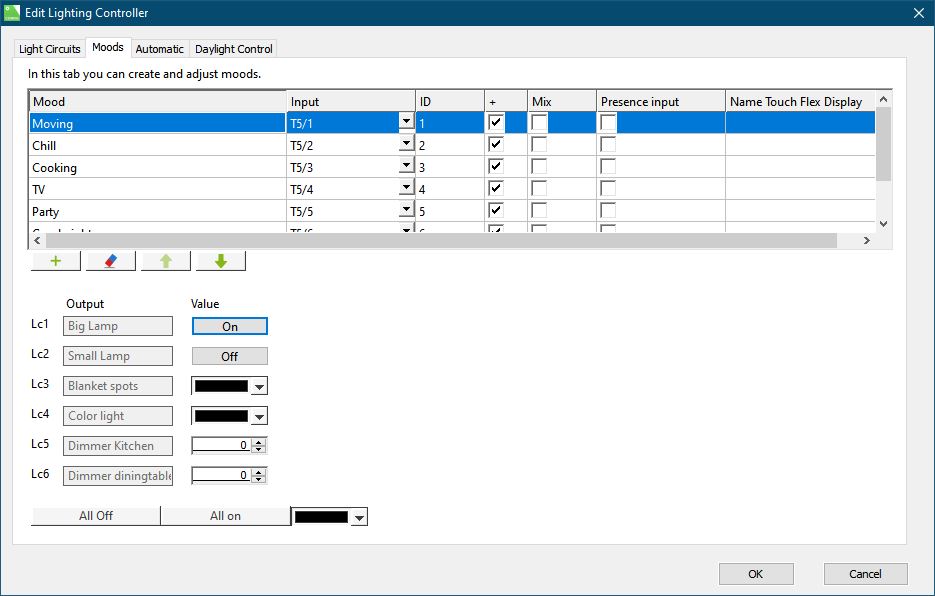
Under the tab Moods, which you can reach by double-clicking on the light control, you have the ability to create up to 89 different lighting moods. Moods can be activated via input (Mood). A total of 8 moods can be assigned to the Loxone Touch inputs (T5/1-8). The inputs (Buzzer), (On) and (Off) can also be configured here.
Mixing of light moods: By default, a one second click mixes the mood assigned to the respective (T5) input with the currently active mood. If "Mix" is checked, the mood is mixed in by a single click. If an output is used by two lighting moods, the higher brightness of the output takes priority.
Automatic on Presence/Motion↑
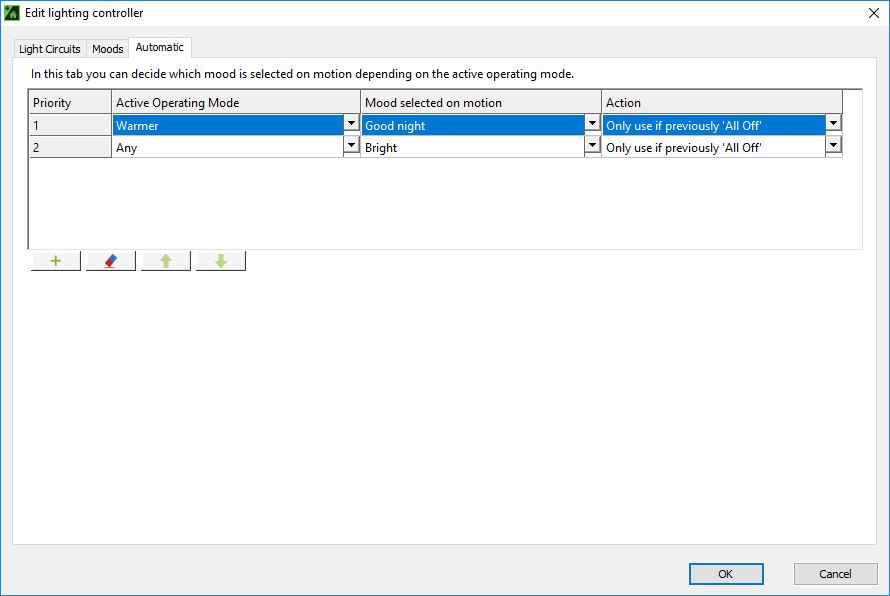
In the "Automatic" tab, you specify the mood that is to be activated for a specific operating mode when presence/motion is detected. The individual operating modes can be prioritized using the arrow buttons.
Use the "Action" column to specify if and under which conditions a certain mood should activate on presence/motion. The following actions are available:
- Only use if previously "All Off": Mood is only activated if no lights are currently on.
- Mix with current mood: Mood is mixed in with the currently active mood and mixed out again after the end of the presence/motion.
- Always change: The mood is activated by motion/presence when no light is switched on or the current mood was activated by motion/presence
Presence inputs↑
Inputs T5/1-8 can be configured as presence inputs by ticking the box for presence in the mood settings. This changes the input name to P/1-P/8

If a T5 input is used as a presence input, the assigned mood is mixed in when the input is activated and mixed out again when the input turns OFF.
The mood is not dependent on currently active operating modes, but is always the mood assigned to the input.
In contrast to the motion sensor input (Mo), the Lighting Controller's parameter (Moet) has no effect on presence! The mood remains active as long as the presence input (P) is also (ON).
Mixing in the mood via presence inputs is deactivated if the input (DisP) is active or the minimum brightness at input (Br) has been exceeded.
If the mood was changed manually after being activated by presence, the light is switched off after the extend time (Met) has elapsed if no more motion or presence inputs are active.
However, if the light is manually triggered (e.g., T5/1) and then the presence input P/x is activated, the system will still adjust the light according to the presence input, even if the lux sensor reading is higher than the (Brt) parameter. This occurs because the lux sensor is only checked when no lights are active. Once the lights are on, the sensor includes the brightness from the active lights and is no longer considered.
If the lighting central block is used, the presence inputs are controlled via the T5/1-8 inputs of the central block.
When using the input of the central block, it should be avoided to use the same input as presence on the lighting controller.
Daylight Control↑
Daylight Control is a function provided by the Lighting Controller block, and simulates the natural color of light during the course of the day.
This function is supported by illuminants whose light color is adjustable.
Daylight Control can be activated separately in the color picker of each supported actuator (RGB, RGBW, Tunable White):

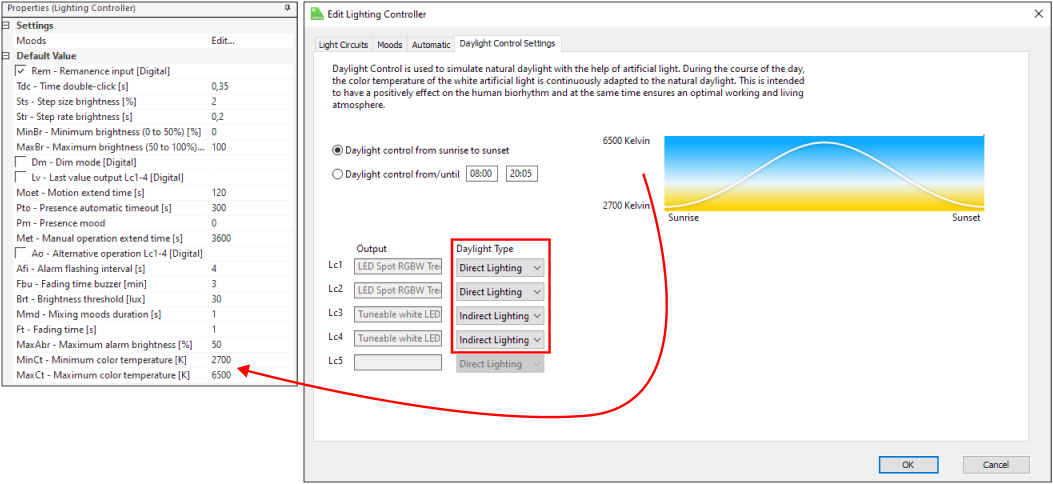
In the Daylight Control Settings, the progression is set based on the length of the day or by a time. Furthermore, for each actuator is selected whether it is direct or indirect lighting.
The coldest and warmest color temperature used is set via two parameters of the function block:
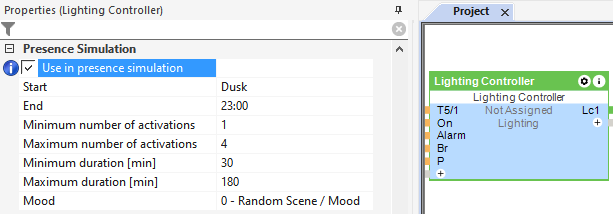
Presence Simulation↑
This function block has a presence simulation.
Activate and define the presence simulation in the properties window:
History↑
In the user interface, the history of the function block can be displayed.
A maximum of 100 entries are shown.
When you restart or save to the Miniserver, the history is cleared.
