The Stereo Extension adds an additional stereo speaker output to the Audioserver/Miniserver Compact. The stereo channel can also be separated and used as two single channels for different rooms or spaces.
The Stereo Extension also features a digital SPDIF output.
Up to 10 Stereo Extensions can be connected to one Audioserver/Miniserver Compact.
Table of Contents
- Commissioning
- Connecting Tree Turbo Devices
- Separate Stereo Outputs
- SPDIF Out
- Status LEDs Description
- Connecting Passive Speakers
- Speaker Installation Planning
- Inputs, Outputs, Properties
- Safety Instructions
- Documents
Commissioning↑
The Stereo Extension is installed on a DIN rail in a suitable enclosure.
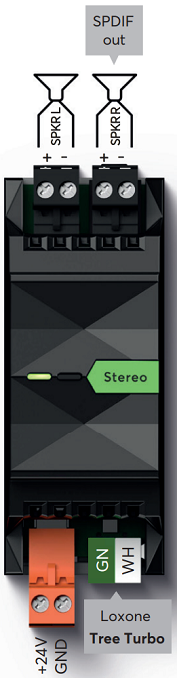
Connect the power supply (orange terminal) and Tree Turbo data lines (green/white terminals). The Stereo Extension will boot its operating system over the Tree Turbo interface, after switching on the power supply. The Audioserver or Miniserver Compact must also be ready for operation. After about one minute the Stereo Extension is ready and will blink orange.
To ensure optimal heat dissipation, the Stereo Extension should be installed upright in the distribution cabinet. In addition, the audio components should be placed in the upper part of the enclosure. Ensure enough distance between the Stereo Extensions for proper air circulation to avoid overheating. Devices that require more heat dissipation (power supplies, other Stereo Extensions / Audioservers, amplifiers, Ethernet devices, ...) should not be placed under them.
To avoid interferences on the speaker lines, we recommend routing them separately from other lines.
After that, please proceed with Pairing Tree Turbo Devices
Connecting Tree Turbo Devices↑
Up to 10 Tree Turbo devices can be connected to the Tree Turbo interface of a Audioserver or Miniserver Compact.
The following wiring topologies are possible, at a maximum length of 150m/492ft:

The Loxone Tree Cable can be used for wiring. Use the green/white wire pair for Tree Turbo, and the 1.5mm² (AWG16) orange/white wire pair for the power supply.
For longer runs or multiple Tree Turbo devices with high power consumption, either install a power supply closer to them, or use multiple supply lines. A separate, larger cross-section supply line can also be used.
If separate power supplies are used, it is not necessary to connect all the GNDs.

|
The Tree Turbo interface is based on a completely different technology than the well-known Tree interface. Therefore, the Tree and the Tree Turbo interface must not be connected! The Tree Turbo data lines should not be run together with other data or signal lines in the same cable. |
The Tree Turbo communication is IP based, therefore IP addresses for all Tree Turbo devices will appear on the network.
If Audioserver or Miniserver Compact are located in a 10.10.10.x network, then they must be set to DHCP and always be assigned the same address by the router, since the connected Tree Turbo devices also communicate in this address range, otherwise IP address conflicts can occur.
Separate Stereo Outputs↑
The option to split one stereo output of the Audioserver or of a Stereo Extension into two separate channels allows you to cover two different rooms or areas with one speaker each. The two outputs can be used independently on separate Audio Player blocks.
To separate the channels, first click on the output of an Audioserver or a Stereo Extension in the Periphery tree, then click on the menu bar button Separate Stereo Output. Now two individual outputs are available in the Periphery tree. In order to merge the two outputs into a stereo output again, click on the button Merge to Stereo Output.
Note: If the outputs are separated, there can be slight crosstalk between the two channels.
This means that at a volume of 65% or higher, you may hear the audio signal on the adjacent channel, even if it is switched off.
For directly adjacent rooms, this effect is usually not noticeable, since at this volume the music from the adjacent room can also be heard through the walls.
The Line Out and SPDIF Out options are not available for separated outputs.
SPDIF Out↑
The SPDIF Out (black jack socket) is a digital electrical SPDIF output. AV devices like amplifiers or active speakers can be connected to this output. Use a 3.5mm jack to RCA cable, the electrical SPDIF signal is output on the left (white) RCA plug. Connect this plug to a digital coaxial audio input.
The output volume is variable and corresponds to the volume that is currently set on the Audio Player.
For a fixed output volume, select external volume mode in the settings of a Stereo Output set to SPDIF.
Equalizer settings are not applied to the SPDIF Out.
Use high-quality shielded cables and run them separately from other cables.
The SPDIF Out can be activated in the properties of the respective output:
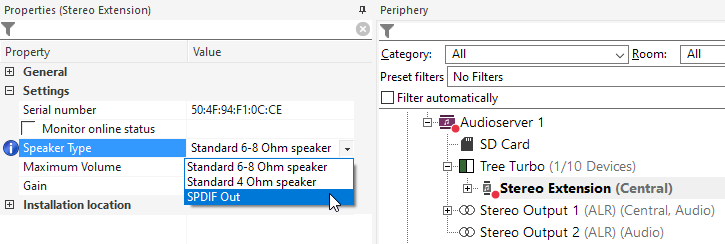
When SPDIF Out is selected for an output, the speaker outputs are disabled and the signal is output at the SPDIF Out instead.
The SPDIF Out option is not available for separated outputs.
Status LEDs Description↑
Left LED:
Orange flashing: Extension has started, but has not yet been paired with the Audioserver/Miniserver Compact, or can no longer reach it.
Green flashing: Everything OK, device is online.
Quick red/green flashing: Device was selected in Loxone Config and is identifying.
Not flashing: Check power supply and Tree Turbo connection.
Continuous green/orange: Extension tries to boot from the Audioserver/Miniserver Compact, but cannot reach it. Check Tree Turbo connection and Audioserver/Miniserver Compact.
Right LED:
Permanent orange: Extension is booting.
Connecting Passive Speakers↑
Speakers like the Loxone/Quadral Install Speaker 7/10 Passive or other passive speakers with an impedance of 4-8 ohms are connected to the speaker outputs of an Audioserver or Stereo Extension:
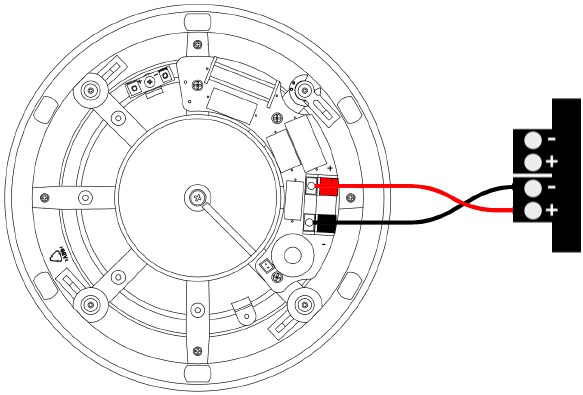
Although the individual speaker outputs are short circuit protected, they must not be bridged.
The speakers are connected using standard speaker cable. The recommended cross-section is at least 1.5mm² (AWG16) for runs under 20 meters (65 ft)and at least 2.5mm² (AWG14) for runs over 20 meters (65 ft). Try to keep the cable length short.
For optimal speaker performance, the speaker type needs to be set in the output's properties in Loxone Config.
In order to drive larger or more powerful speakers, the Line Out or SPDIF Out can be used to connect an external amplifier.
Speaker Installation Planning↑
Loxone Install Speakers require installation in a closed enclosure or a cavity, such as in ceilings or walls, to fully develop their sound volume.
Suitable mounting enclosures for drywall or concrete installation are available in the Loxone Shop.
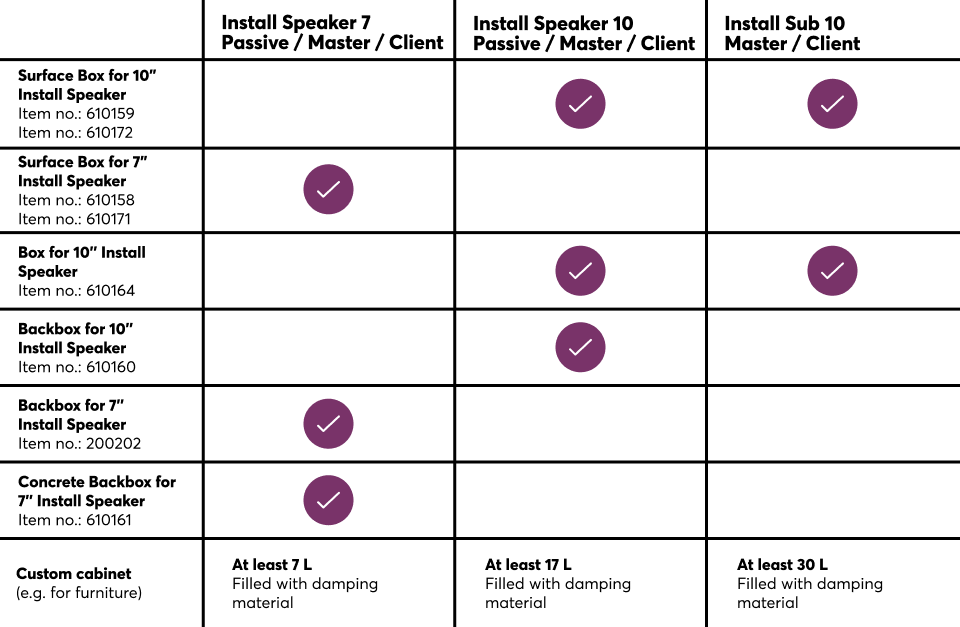
While a mounting enclosure is not necessarily required for completely enclosed surfaces, speakers must be mounted in a rear mounting enclosure for open surface structures, like acoustic ceilings.
The acoustically necessary volume for installation depends on the speaker size and type:
| Speaker Type | Minimal volume | Recommended volume |
|---|---|---|
| Install Speaker 7 | 7.2l | 9l or more |
| Install Speaker 10 | 14.5l | 18l or more |
| Install Sub 10 | 18l | 30l |
Larger enclosures or cavities may also be used, provided they are closed.
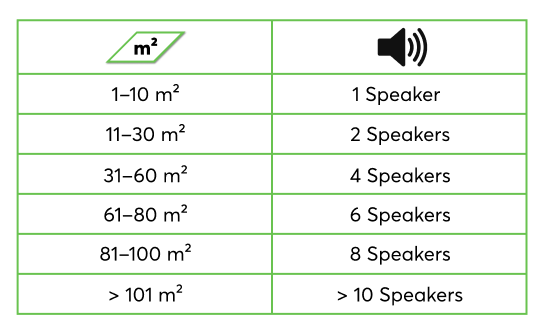
Speaker Quantity
In main living areas, at least two speakers should be used to achieve good sound quality. For small rooms or ancillary spaces, a single speaker is usually sufficient.
Depending on the room size, we recommend planning the following number of speakers per room:
Ceiling installation
Plan the speaker installation positions to be evenly distributed throughout the room. A minimum distance of 50cm/20″ from walls should be maintained to avoid sound reflections.
In ceiling installations, the stereo effect is barely noticeable and can often be neglected. Therefore, a full stereo signal is later assigned to each individual speaker via the connection to the Audio Player block (Downmix).
Wall installation
At the most frequently used listening position, at least two speakers should be arranged to achieve a good stereo effect.
The left-right assignment of the speakers is made later through the connection to the Audio Player block.
Diagnostic Inputs↑
| Summary | Description | Unit | Value Range |
|---|---|---|---|
| Amplifier limit | If the temperature of the amplifier reaches a critical point, the volume of the zone is reduced. This may be due to overloading or excessively high ambient temperature. | - | 0/1 |
| Online Status Stereo Extension 1 | Indicates whether the device can be reached by the Miniserver. Diagnostics for Air devices Diagnostics for Tree devices Diagnostics for Extensions |
Digital | 0/1 |
| Temperature Shutdown | Input is active, when the outputs of the device have been switched off due to high device temperature. Possible reasons: Ambient temperature too high, outputs overloaded. | Digital | 0/1 |
Properties↑
| Summary | Description | Value Range | Default Value |
|---|---|---|---|
| Serial Number | Specifies the serial number of the device. | - | - |
| Monitor Online Status | If checked, you will be notified via System Status or the Mailer if the device is no longer available or goes offline. | - | - |
| Speaker Type | Speaker type used in this zone to find the optimal sound settings. | - | - |
| Maximum Volume | Determines the maximum (physical) output power of the amplifier in percent, thus limiting the maximum possible volume for this output. The volume values from 0-100% of the Audio Player or App are scaled accordingly. | 0...100 | 100 |
| Gain | Increases or decreases the volume of this output in percent. Adjusts the volume of outputs used with different speakers or in different environments, making it possible to achieve equal volume levels. Is scaled and limited with the specified maximum volume. | -20...20 | 0 |
Safety Instructions↑
Installation must be carried out by a qualified electrician in accordance with the applicable regulations.
This device must be mounted on a DIN rail in an electrical distribution enclosure to ensure protection against contact, water and dust.
Only mount the device on a horizontal DIN rail to ensure heat dissipation by convection.
Documents↑
Datasheet Install Speaker 7 Passive
Datasheet Install Speaker 10 Passive