Contents
Technical Data
Power Supply:
Commissioning Air:
In delivery state, pairing mode will be active after the power supply has been established. This is indicated by the light flashing red/green/orange.
Then follow the pairing procedure
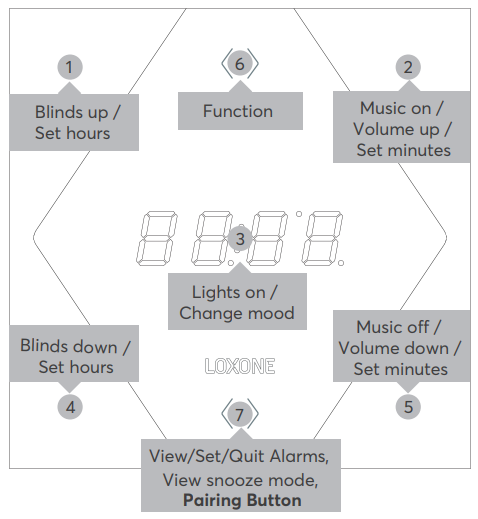
To activate the pairing mode, hold down the pairing button for at least 5 seconds after establishing power supply. The pairing button is button 7, centered at the bottom.
Programming
Inputs
| Name | Description | Type | Values |
| T5 | Combined T5 input. | T5 | – |
| Buttons 1-5 | These inputs are hidden by default and can be displayed via the properties of the device. | Digital | 0/1 |
| Button 6 | This input is controlled via the upper middle button on the Touch Nightlight Air. | Digital | 0/1 |
Outputs
| Name | Description | Type | Values |
| Smart Actuator RGBW | RGBW Lighting output for the Backlight on the Touch Nightlight Air. This is a standard Smart Actuator output to be used with a Lighting controller. | Smart Actuator | – |
| Dimmer RGB | Combined RGB output. This only appears if the device is set to “standard” type. | RGB | – |
| Dimmer WW | WW output. This only appears if the device is set to “standard” type. | Analog | 0…100 |
| Temperature | Displays the temperature from different sensors. If used it will swap between it every 5 seconds. | Analogue | ∞ |
| Status LED | LED in the top button (button 6). | Digital | 0/1 |
Functions
Downloads:
If available, the following documents can be downloaded:
- Product Datasheet
- Pairing Instructions
- Quick Start Guide
- Declaration of Conformity
You can find available downloads here.
 The Touch Nightlight Air is powered by the supplied USB power supply. Only use the original power supply provided.


