Table of contents
Basics
Creating users and assigning user groups
User properties and passwords
User Management
Permission Handling Logic
Verifying permissions
Access schedules
Import/Export users from/to CSV file
Basics:
With the user “admin” you log on to your Miniserver for the first time and perform the basic programming of the system.
The user “admin” is a member of the user group “Full Access”, and thus has all available rights.
Because of these extensive rights, creating a strong password is of high priority, and should always be the first step.
If you have forgotten the password of the user “admin”, it can be reset with the SD card.
The following information refers to the User Management in Loxone Config. The same principles apply to the User Management in the Loxone App.
Creating users and assigning user groups
First, create the required users and user groups using the buttons in the menu bar, as shown in the example below.

Users can be assigned to the appropriate user groups in multiple ways. The simplest method is to drag and drop a user onto a user group.
Alternatively, you can select a user and click ‘Manage Permissions.’ This will open the User Management screen, where you can add the user to a group via the ‘Groups’ tab.


Another option is to navigate to the user group and select ‘Manage Permissions.’ Here, you can add members to the group and view existing users. To remove a user from the group, simply uncheck the corresponding box.

Additionally, other user groups can be added to a user group, as shown in the image above. The added group will inherit the same rights as the parent group.
User-specific settings can be configured in the user properties:
General: Enter basic information such as username, email address, phone number, company, and more.
Permissions: View or manage the user’s permissions.

Status: Enable or disable the user and define whether their access should be limited to a specific time period.

Authentication: Configure user access via NFC tags, access codes, iButtons, or external IDs (e.g., fingerprint scanners).

Password: Set a secure password for the user.

User Interface Password: Protect specific functions in the user interface/app with an additional password. Once entered in the visualization, the password remains valid for one minute before requiring re-entry.
User Management
Clicking on “Manage Permissions” for a User or User Group opens the User Management window.
In this window, you can assign permissions to individual users or entire user groups. You can define access rights to specific Rooms, Categories, or specific Functions within the user interface. Additionally, you can grant either Internal or External access—or both. It is also possible to set an access schedule for NFC permissions.
The “Rights” tab contains general permissions for managing the system, customizing settings, and accessing the web interface or app.

Automatic Designer and Scenes: Grants ability to create and edit Automatic Rules and Scenes directly in the Loxone Apps and the Loxone Web Interface.
Change Own Passwords: Grants ability to change their own passwords in the Loxone Apps and the Loxone Web Interface.
Edit User Interface: Grants ability to edit user interface-specific settings of function blocks directly in the Loxone Apps and the Loxone Web Interface.
FTP: Grants access to the Miniserver via FTP.
Loxone Config: Grants access to the Miniserver using Loxone Config. Grants administrator privileges, providing full access to all system rights.
Miniserver Backup: Grants ability to create a backup of the Miniserver via services such as Exosphere.
Miniserver Update: Grants ability to update the Miniserver via the Loxone App/Web Interface or services such as Exosphere.
Operating Times: Grants ability to create and edit Operating Times directly in the Loxone Apps and the Loxone Web Interface.
User Management: Grants ability to create new users and edit existing user settings directly in the Loxone Apps and the Loxone Web Interface. Note: Only users with administrator privileges can create or edit other users with administrator privileges.
Web Interface/Apps: Grants access to the Miniserver using the Loxone Apps / Web Interface.
Example:
A user has access to the Web Interface and the ability to change their own password.

It is also possible to explicitly deny rights. The exact handling of this process is explained in the Permission Handling Logic section

In the “Rooms” tab, you can define which rooms a User/User Group has access to.
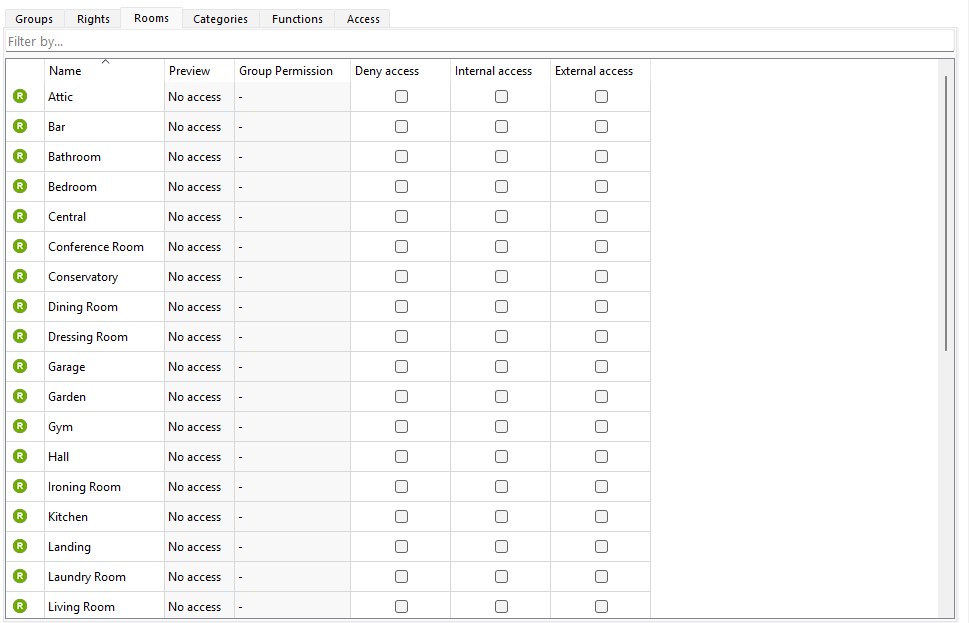
The “Categories” tab functions similarly, allowing selection of accessible categories.

The “Functions” tab enables the selection of specific system functions on a per-user basis. Here, you can also find a list of Trusted IO functions.

In the “Access” tab, you can manage permissions for NFC Code Touch devices and assign Custom Access Schedules if required.

In the “Devices” tab, you can manage the Intercom. This option is only visible for User Groups or Trusted Miniservers.

Permission Handling Logic
Permissions are determined based on a hierarchy of users and their parent entities(User Groups). The rules are as follows:
- If the user or any of its parent entities has the permission explicitly allowed, we set an “allow” bit.
- If the user or any of its parent entities has the permission explicitly denied, we set a “deny” bit.
Final Permission Outcome:
- If anyone sets the deny flag → the permission is denied.
- If anyone sets the allow flag and there is no deny flag → the permission is allowed.
- If no flags are set → the permission is not allowed (also referred to as “not configured”).
Note: “Not allowed” functions the same as “denied,” except that it is not inherited from a parent entity.
Verifying permissions
The following function provides an overview of the rights assigned to a user or user group, along with the reasons for these permissions.
To view this information, select a User or User Group and click on “Show All Permissions

For example, for the user “admin”:

You can clearly see which rights, rooms, categories, and objects the user has access to. Additionally, it indicates whether the access is internal, external, or both, along with the corresponding path.
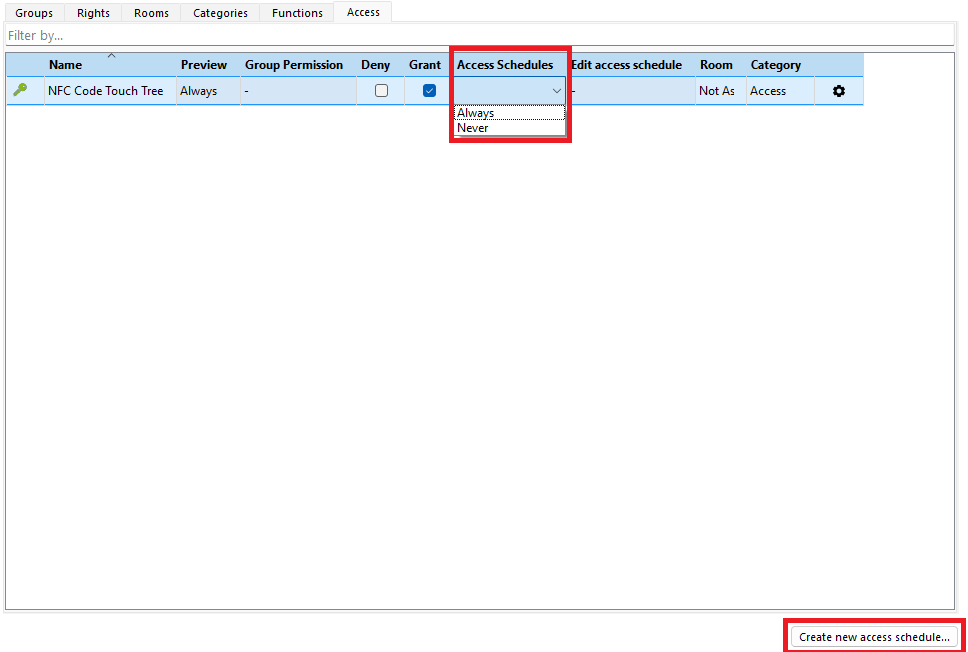
Access schedules
Access can be granted to users or user groups for a limited period.
To configure this, select a user or user group, then navigate to Manage Permissions → Access (visible only if an NFC block is configured).
By default, there are two access schedules: Always and Never.
To create a custom access schedule, click on “Create new access schedule…”.
Give the access schedule a name, such as “Office Hours”, to define specific access times.

Next, you can define a custom schedule based on your specific access requirements.

If the access schedule is changed to the custom schedule, the user will only have access during the specified times.

The created access times will then be listed in the Periphery tree under Access Schedules and can also be edited there:

Import/Export users from/to CSV file
Starting with Loxone Config 12.1 it is possible to import users from a *.csv file.
This way a large number of users can be created with minimum effort and time.
Create file with users:
The template file is provided in Loxone Config.
Click on “User” in the Periphery , then on the “Import Users From CSV” button in the menu bar at the top.

In the following window, click on “Download template file…”:

The *.csv file is saved on the computer.
This template can now be opened and edited with a compatible program (e.g. Excel,…).
The users along with the relevant data can now be added:
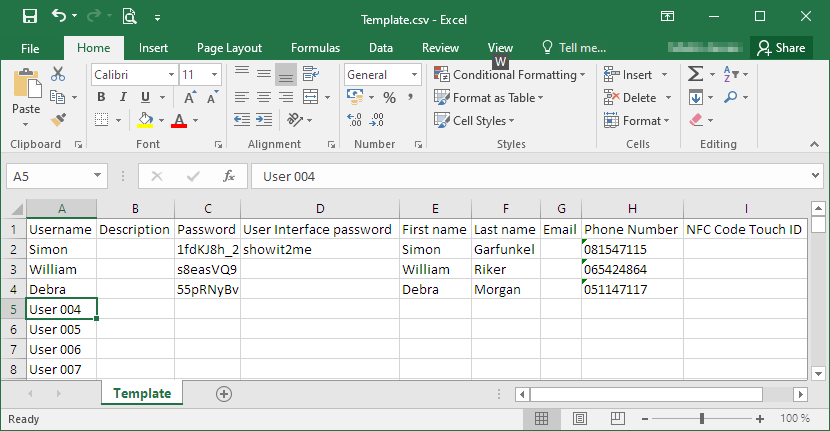
After adding the users, the list must again be saved on the PC as a *.csv file.
Import file with users:
As before, first click on “User”, then on “Import Users From CSV”.
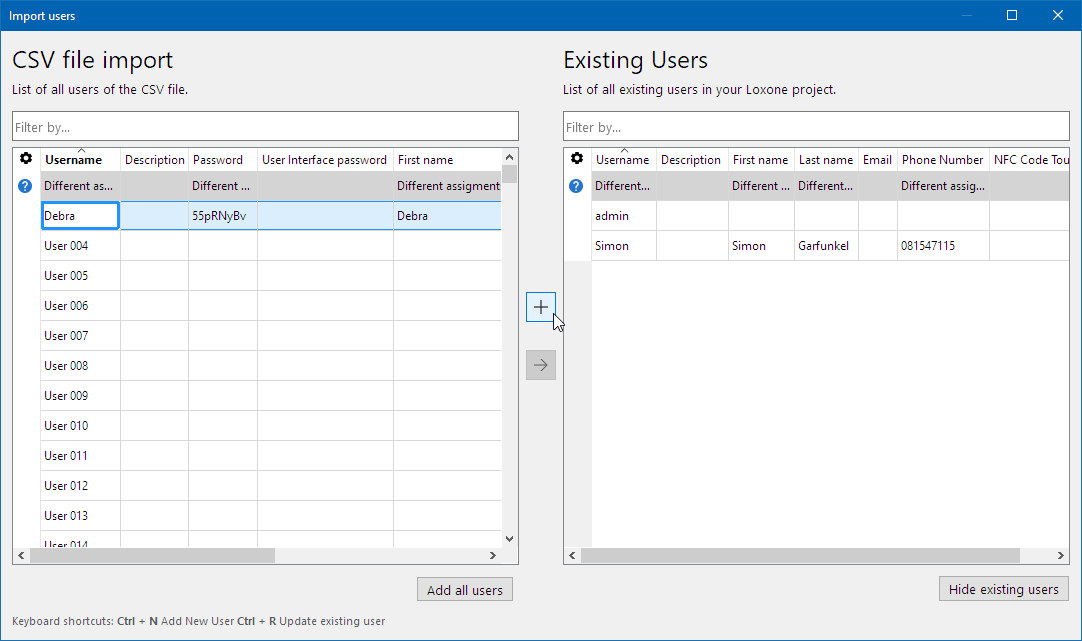
Then click on “Open CSV file” in the following window:

Next, select the prepared file containing the user data, and they will be displayed in the next window.
Users can now be added to the program individually or all together:
The added users are then listed in the Periphery tree:

Finally, the program must be saved to the Miniserver.
Additionally, users can be exported to a CSV file by clicking on “Export Users to CSV.”
