The NFC Code Touch provides access control via encrypted or unencrypted NFC tags or a key code entered via the touch keypad.
Supports permanent, one-time or temporary codes. With multi-purpose / doorbell button
Datasheet NFC Code Touch Tree Gen. 1
Table of Contents
- Mounting
- Commissioning
- Blinking codes
- Change Sensitivity
- Inputs, Outputs, Properties
- Safety Instructions
- Documents
Mounting↑
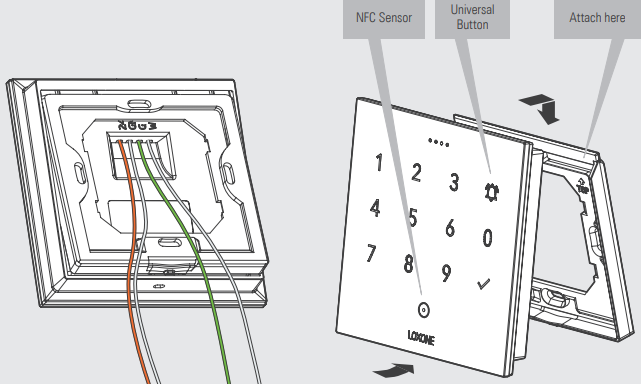
The NFC Code Touch is mounted directly to the wall or a suitable back box using the included mounting frame.
The mounting frame must lie flat on the wall in order to ensure secure installation. The NFC Code Touch is placed on the top of the frame and snaps into place at the bottom. To remove the device, firmly pull on the lower edge until it releases.
Water on the surface of the NFC Code Touch can interfere with its operation. After the surface dries, the NFC Code Touch automatically re-calibrates and operates as usual.

Commissioning↑
Connect the device to the power supply (orange/white) and Tree communication wires (green/white).
Then follow the pairing procedure on the Tree Interface.
Blinking codes↑
A detailed listing of the different LED states can be found at here.
| Blinking code | Meaning |
|---|---|
| WHITE (LEDs indicate countdown) | Starts when a digit is pressed and displays a timeout indicating how long the digit is valid when entering the code |
| GREEN fading out | Indicates "Access granted" after correct code was entered & confirms universal button press (bell symbol) |
| RED fading out | Indicates "Access denied" when incorrect code was entered |
| RED rapid flashing | Device is locked after repeated use of an unauthorized NFC tag or code, or by activation of the input (Off) of the function block. If an unauthorized NFC tag or incorrect code has been used 15 times in a row, the device is locked for 2 minutes. By using a valid tag, this lock can be ended early. Manual lock: Device is locked as long as the input (Off) of the block is active. |
| CYAN fading in/out | Indicates the learning mode for NFC tags |
| Individual | User can control all 4 LEDs (simultaneously) in individual colors via Loxone Config. |
Change Sensitivity↑
In some settings, it may be necessary to change the sensitivity of the keypad using a device command or webservice command.
Each key can be addressed via a TH number:
TH0=Proximity (determines the general sensitivity for the first keypress only)
TH1=Bell Button
TH2=Key 0
TH3=Checkmark
TH4=Key 3
TH5=Key 6
TH6=Key 9
TH7=Key 2
TH8=Key 5
TH9=Key 8
TH10=Key 1
TH11=Key 4
TH12=Key 7
Each key has a certain value assigned to it. First this value has to be queried. Example for key 2:
http://<ip-miniserver>/dev/sys/wsdevice/<device-serialnumber>/get/TH7
The result for example is value 14. Make a note of this value so that you can restore it later.
You can now reduce the sensitivity by assigning a higher value:
http://<ip-miniserver>/dev/sys/wsdevice/<device-serialnumber>/store/TH7/15
To increase the sensitivity, select a lower number.
Numbers below 10 do not need a leading zero.
Finally, the change must be accepted by restarting the device:
http://<ip-miniserver>/dev/sys/wsdevice/<device-serialnumber>/Reboot
Change the sensitivity only in small steps as in the example. Check if the keys react accordingly. If the change is not sufficient, the command can be repeated with a higher/lower number.
Actuators↑
| Summary | Unit |
|---|---|
| API Connector | Text |
Diagnostic Inputs↑
| Summary | Description | Unit | Value Range |
|---|---|---|---|
| Online Status NFC Code Touch Tree Gen. 1 | Indicates whether the device can be reached by the Miniserver. Diagnostics for Air devices Diagnostics for Tree devices Diagnostics for Extensions |
Digital | 0/1 |
Properties↑
| Summary | Description | Default Value |
|---|---|---|
| Monitor online status | When selected, you will be notified via System Status or the Mailer if the device is no longer available or goes offline. | - |
| Serial number | Specifies the serial number of the device. For Extensions: Enter 'Auto' to automatically pair an extension with unknown serial number. This can only be used if there is only one Extension of the same type. Save into the Miniserver, in order to pair the Extension. Afterwards the program must be loaded from the Miniserver to transfer the actual serial number of the Extension into the program. |
- |
| Device type | Tree device type | - |
| Audible confirmation | Audible confirmation on button press | - |
Safety Instructions↑
The installation must be carried out by a qualified technician in accordance with all applicable regulations.
The installation requires a suitable enclosure to ensure protection against contact, water and dust.
For security reasons we strongly recommend that you only use encrypted NFC tags from Loxone for access control.
Documents↑
Datasheet NFC Code Touch Tree Gen. 1